Wednesday, 10 February 2021

Let's Tuckerize - A Valentine Mug Rug


I'm a devout "Tuckerizer"!  What is "Tuckerizing"?

Tuckerizing is a method of adjusting the cutting blocks slightly larger and using the Studio 180 Design Tools to trim the blocks to size.

The blocks are more accurate and despite cutting the blocks slightly larger, you end up saving fabric!  Did you know, only 10% of all quilters are accurate piecers.  With the Studio 180 Design Tools - you too can make more accurate blocks.  

Today, I'd like to share how to "Tuckerize" Cluck Cluck Sew's Heart blocks.  The link to Allison Harris' heart block tutorial can be found below:

Simple Heart Block

https://cluckclucksew.com/2015/01/making-heart-blocks-in-multiple-sizes.html

This tutorial provides instructions for making heart blocks in multiple sizes using a stitch and flip technique.  Allison has done the heavy lifting in the design and writing of the block.  The block sizes range from 4" through to 10" finished.

I must admit, my stitch and flip blocks have not been accurate.  However, by simply changing the technique to use the Corner Pop Tool, you will have accurate blocks that go together easily and with accuracy. 

With the size of the Corner Pop Tool, we can Tuckerize the 5" through 10" finished block sizes.  The size of the 4" finished block is just a bit small for this tool.  I have produced a chart which has the revised cutting for the 5" through 10" blocks. Here is the link to the PDF for the resized cutting instructions:

Let's Tuckerize Hearts

To make the Tuckerized Blocks simple, also take time to refresh you knowledge of how to use the Corner Pop Tool.  Letter sized instruction sheets can be downloaded for free from the Studio 180 Design website.  

Corner Pop Letter Size Instruction Sheet

I have printed the letter sized instructions for all my Studio 180 Design Tools and have them in sheet protectors in a reference binder.  It works well.

Let's start cutting the Valentine Rug Mug.  For the Rug Mug, we will be making a 5" finished size heart block.  Please refer to the chart in the resized cutting chart.  Of note, when you are cutting the background triangles, you first cut a square of the size noted and and then cut the square into two triangles by cutting along the diagonal of the square from one corner to the opposite diagonal corner.

Cut all the pieces for the 5" finished block using the resized cutting chart.

Select the 2 - 3" x 5 1/2" print rectangles and place them WRONG SIDES TOGETHER on your cutting mat.  Then using my Corner Pop tool and the 2 1/2" and 3/4" Cut Away Corner lines on my tool I cut the rectangles as noted in the photo below right.


The 2 1/2" Cut Away Corner line is used to cut the bottom right corner of both rectangles.

The 3/4" Cut Away Corner is used to cut the top right and left corners of both rectangles.

By placing the rectangles Wrong Sides Together, you will have a mirror cut on the bottom corners of the rectangles.  See the photo below.


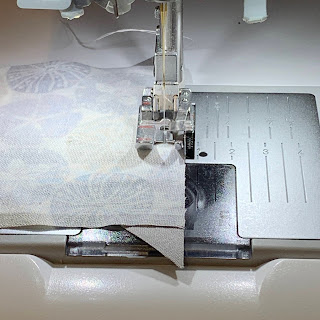
Using the instructions from your Corner Pop tool, sew the replacement background triangles to the cut print rectangles.

Your seams will be more accurate if you have the print rectangle on the top when sewing on the rectangles.

Press to set your seams and on one rectangle, press all the seam allowances towards the print rectangle.

For the second print rectangle, press all the seam allowances towards the background replacement triangles.


Varying the pressing of the seam allowances will result in both intersecting seams along the center seam to "nest".  With the nesting of the intersecting seams, your heart block will be perfect!

Your heart block will measure 5 1/2" square.  Continue to construct your mug rug using the instructions on the Let's Tuckerize Hearts reference sheet.

For a little added interest, consider adding big stitch quilting on the "mock binding".

I hope your Valentine enjoy's their Valentine Mug Rug.

My go to Studio 180 Design Tools are part of my essential quilter's tool kit.  These tools are not a one project tool.


Sunday, 6 December 2020

Simple little handmade gifts, they just make me smile!

As I write this post from my comfy chair, I'm looking about my great room and my eyes drift to all the handmade items in the room.  The quilts, pillow, wool table toppers and stitched pictures....it just makes me smile.  

Those hand made items warm up the room and make me think back to when they were made or received with a smile.  Now more than ever, a simple project can spread those smiles and let someone know you were thinking of them.  It's like a virtual hug!

Over the years I have taught, I shared some simple little projects.  Not all projects shared were mine, so with credit was provided to the designer.  

Today I thought I would re-share some of these simple projects so you too could make someone smile this year.  

And when you deliver them, be safe and don't forget to "Ding and Dash"!  (Thanks to Michelle Peters of Watergirl Quilt Company for this catchy delivery method!)


From December 2017 - A simple Circle Mug Rug


Whilst I had seen this design on Pinterest, the link was missing so, giving full credit to the original designer, I drafted the instructions.

Download your copy of the instructions here:

Circle Mug Rug


From June 2016 - Raccoon Case

One of the easiest zippers to insert into a practical eyeglass case, pencil case or a case for small scissors.  You'll never want to sew in a two sided zipper into a small case!

http://blogg.pinkponydesign.com/2015/10/keep-your-sunglasses-safe-raccoon-case.html


From April 2016 - Quilt Block Design Board

We all have done it, laid out a block on our cutting mat and in the process of carrying it to our sewing machine, we flipped a piece, sewed a seam on the wrong side or....

Lori Holt had a solution for this in her Quilt Block Design Board

https://www.youtube.com/watch?v=uO-fosn6Yfs


Wednesday, 11 November 2020

A Day to be Thankful - Virtual Show and Tell

Our posts today were filled with images and words describing what we are thankful for, tonight was no different for me. 

It was also Virtual Show and Tell night.  

A group of Alberta and Arizona quilters gathered together on Zoom to share their work as part of our quilting community.  The banter at the beginning of the call as everyone said hello and shared the weather - from 70 degrees Fahrenheit of Mesa to minus 17 Celsius of Pincher Creek, alas no sympathy for Andi in Mesa.

At this time, I am spending my evenings doing big stitch quilting and have tried my hand at Siddi quilts.

The repetition of the big stitch quilting is very calming amidst the chaos around us.

The technique has also be described as Kawandi quilting.

I have a habit of throwing all my scraps from a project into a bucket.  Those buckets of sorted scraps are perfect for this technique.  

I layer a backing (pressed in 1/2" around the perimeter) with batting and then scraps which have seam allowances pressed under on two sides.  Layer around the perimeter, pin and then big stitch quilt in concentric 1/2" rectangles around the piece.  


For more details check out the Show and Tell link to the presentation from this evening.

Thank you to the ladies of my quilting community that made time to join us tonight.  

Show and Tell Nov 11, 2020


Tuesday, 27 October 2020

Borders Reference Page - A Tool for You

Borders on a quilt are not just for traditional quilts!

Often a border cut from the background fabric can make blocks look like they are floating on the quilt top.  

Take my Double Dash Quilt, there are borders of the background fabric around the double churn dash blocks.


Borders can make or break the size and shape of a quilt top.  Absent a measure, measure, measure and average technique for determining the length of a border can result in "wavy"borders.  A wavy border results in a quilt top that is anything but square.

Save yourself and perhaps your long armer some grief and take the time to apply this technique when adding borders to your quilt top. 

Download the Borders Reference Page from the link below for the next time you have to add borders to your quilt top.

Borders Reference Page


Saturday, 27 June 2020

Scrap Basket 2 - Step 11 Final Step

Inspired by a Tile

The inspriation for this block, came from an unusual place, the tile on the walls in the Vancouver airport bathroom.

Picture this, the tile has grabbed my attention.  I can't stop looking at the tile.  I don't have enough time to sketch out the block before I have to board my flight to Phoenix.  My family can't hold the boarding long enough for me to sketch as I was travelling alone this flight.  So snap, I did it.....I took a picture of the tile in the bathroom.  I quickly looked around, phew I was safe no one saw me snapping the picture.


Here is the picture.  Its not the greatest picture, but you can imagine the need for a quick snap!


Whilst this block is likely one of the easiest blocks in the quilt to piece, it is one of the hardest blocks to select fabrics to make it shine.


When I have taught this block before, I have
preselected some of the fabrics for the cuts and had chosen 2 - 4 fabrics for each of the remaining cuts.

Using the cameras on our phones, we auditioned the fabrics for the different cuts.  It was interesting to watch the debates over the fabrics and color choices.

Our quilting personalities sure came out.  It was great fun.


With this block, fabric selection and placement are key to creating movement.  Consider using:

  1. Large scale print
  2. Medium scale print
  3. Small scale print
  4. Geometric or striped variation
  5. Random dots.

Try the technique to select the fabrics for your blocks.  But, above all have fun!

This is the last block for the Scrap Basket 2 Quilt Along, just in time for the summer.  Don't forget to post your photos of your quilt on social media!

I started the first Scrap Basket Quilt Along January 18, 2020 and the Scrap Basket Quilt 2 Quilt Along launched April 18, 2020.  I hope you enjoyed these projects as we have navigated through our new normal.

Remember,  It's not about keeping busy, it's about being at "piece"!

Download the instructions for Step 11, the final step from the link below:

Scrap Basket 2 - Step 11 Final Step


1.   


Saturday, 20 June 2020

Scrap Basket 2 - Step 10

Sliced Square

After last week's marathon of 36 blocks, I have a simple 6 blocks to complete this week.  With this week's blocks, the 6 - 24 1/2" blocks can be sewn together.  We are then down to the last 6 blocks to complete the entire quilt on June 27th in time for our summer break.

Back to this week's block.

A simple pieced strip is all that it takes to make this block pop.  The inset 1/2" finished strip is simple when it is cut from a larger strip set.


Slicing the blocks for the inset strip are entirely random, creating more movement in the quilt.

You start with a 5" square, slice it up and inset the 1" solid strip with the dark solid square of

This block would be great for an entire quilt of 5" squares of scrap fabrics.  Consider insetting a black on white slice with a black solid square to bring it all together.

Consider this block as the reward for all the sewing last week's 36 blocks.


Here is a shot of two of my 24 1/2" blocks I completed this week.

We are in the home stretch!

Download the instructions for Step 10 from the link below:

Scrap Basket 2 - Step 10


Saturday, 13 June 2020

Scrap Basket 2 - Step 9

Square in a Square

Simple solids surround an offset print centre square in this classic block.  We have our work cut out for us this week, as there are 36 square in a square block in the quilt.

The use of solids can have a calming effect in a busy quilt as they provide a place for our eyes to rest.

Square in a square blocks can be a challenge to keep the points on the offset square.

In this block our centre square is 3 3/8".  This odd sized square will take a bit of time, and glasses to cut.

A couple of simple tips can assist with ensuring you have a full 1/4" seam allowance at the points for the centre square.

The first tip:  It all starts with a larger triangles for the sides of the centre square.  You start with a    3 1/4" solid square at and cut it in half along the diagonal.

These triangles will be a fair bit larger than the centre square.  You will have "dog ears" over 1/4" beyond the edge of the centre square.  Ensure the long side of the triangle is centred on the side of the centre square.

The second tip:  When you sew the long side of the triangles on to the centre square, have the centre square on the top as per the photo at right.

If you are like me, my natural tendency would be to have the triangle on the top when you sew the seam.  However, this contributes to less than accurate block.

Why?

It's hard to sew an accurate 1/4" seam along the centre square if you can't see it.

Third Tip: Before you press the triangle away from the centre square, run your fingernail along the seam to flatten the seam.  Press and lightly starch.  My go to starch is the Acorn Easy Press Pen.  This pen doesn't over wet the block.  Over wet blocks tend to ripple as opposed to lying flat.

Once sewn, the block will be oversized.  A slightly oversized block can be trimmed to an accurate 4 1/2" square.

You will get a lot of practice making this block, by the time you complete the 36th block you will have perfected this technique!

Download the instructions for Step 9 from the link below:

Scrap Basket 2 - Step 9