Saturday, 30 July 2022

Revisit Scrap Basket 2 - a Wedding Gift

In preparation for a family wedding - my nephew, Matt and his wife to be, Candace, I gathered their input for a wedding quilt.  Let's be serious, I gathered Candace's input! 

My ask, which of my quilts designs would you like for a wedding quilt? 

Much to my surprise her choice:


My original Scrap Basket 2 quilt.  Yes, it is a scrap quilt.  Any of my quilting friends know I love neutral quilts and have amassed a large stash and scraps in this color palette. 

Working in a neutral palette can be a challenge.

With the assistance of our digital cameras/phones, you can master this challenge.

"Color gets all the credit, but Value does all the work!


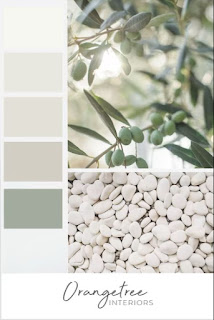
When I asked about a color palette for the wedding quilt here was her choice:

My first reaction, lovely how serene.

My second reaction, let's dive into my stash.

My last reaction,  I'm missing some greens!  Yes, I too had to go shopping for those sage greens and yes some darker greens.

Absent some variation in values, my design would become mud.  

Let's change up the palette to black and white to demonstrate the concept.


.Here is the same image in black and white. The color swatches at the left show little of the different values in the inspiration photo.

This was purposeful on the part of Orangetree, as it was a color palette for interior design purposes. Whilst this will work for interior design, it would pose a challenge in a quilt.

We need the range in values to define the design in a quilt.  

Absent the value range we have mud.  Whilst I understand this, I hope my niece will understand this as well as I add a range of values to their quilt.


Let me illustrate!

At left my image in black and white.


At right my image in color.


Do I have a range of values?


Perhaps yes!

Are you along to create your Scrap Basket 2 quilt?

Let's get started.

Consider using a monochromatic color palette in 2 - 3 colorways.  Try to include one Solid fabric per colorway.

The first step is to sort your scraps.  If your scraps are not sorted by color, the first step is to sort by color.  Then sort your scraps by value.

Color and value is relative.  Pick one fabric of the first colorway that "appears" to be a mid value, and start a new pile.  Then select another fabric and compare it to the original.

Is it darker or lighter?  I like to work left to right, lighter left and darker right, creating three piles for this colorway.  Essentially you will have created a light, medium and dark pile.  

Take a photo in black and white.  Look at the image, do you have some outliers?

If yes, adjust your piles and take another black and white photo.  Continue this process until all your fabrics are sorted.


Here are my fabrics sorted.


Join the Quilt Along and tame your scrap piles.

The quilt will finish at 60" x 72 and is constructed in 6 - 24 1/2" square blocks (there are blocks within these blocks) and 6 - 12 1/2" square blocks.

Download the instructions for Step 1 in the link below.

Scrap Basket 2 - Step 1

Feed your soul, take time to create.  It's not about keeping busy, it's about being at "piece"!


Monday, 10 January 2022

42 Plus 3 - Steps 3 & 4

 It's a new year!  

Whilst it is a new year, some things have not changed.  

We are all spending more time at home and are looking to our creative outlets to pass the time and assist with our mental health.  I have often been told, you need to go down to your studio and play.  You may recognize the agitation or vibration that you can actually feel.  For me, when it really gets bad, the migraines also start.

After a few hours, my studio the agitation is gone and the migraine has started to subside.  

As we all retreat to our quilting spaces, it's time to continue progress on my complementary project, 42 Plus 3.  I recently finished steps 3 and 4 and my pattern testers have completed their edits.  

Today I'm sharing a couple of insights about how color can completely change a block.  Once you complete step 3 you may have noticed that you can assemble the large blocks one of two ways.  By simply changing up what side of the completed smaller blocks meet up in the center the design can entirely change.  Simply changing up the orientation of the Fabric 1 and 2 sides of the block the quilt will be very different.  This is best illustrated through photos.  

One of my pattern testers, Pat decided to only make 8 blocks and make 2 smaller table toppers as opposed to the larger quilt.  Her choice was influenced by her jelly roll only having 40 strips instead of 42 and some challenges in finding fabrics for the remaining 5 strips.  


Out of a challenge a new learning opportunity was born.  

Here is Pat's first layout of her large blocks.  This was Pat's initial thought was the layout with the black center star and partial stars on the perimeter of her table topper.

Pat will be adding a black border to this topper to finish it off.  


Now, switch it up!  No change in the blocks themselves, just a rotation of the blocks such that the center star and partial stars are now the pale pink fabric.  

What a difference!

For this topper, Pat will be adding a 3 1/2" cut pink border all around the blocks.  The stripped sections will then appear to float on the pink borders.

So, depending upon your available fabrics, you can always choose to change the color of your borders for a completely different look.  Pat's table toppers will finish at 42 1/2" square.

Here is the link for the pattern for steps 1 through 4:

Sunday, 21 November 2021

A Neutral Palette Challenge & My Top 25 Notions

What’s on my design wall? 

A neutral color challenge!  Take 8 neutral fabrics in greys and taupe and see where it I can take it.


✔️ First up simple flying geese 


Simple? 


Perhaps,.... but I still have to take notice of light medium and dark and their placement.  A neutral color palette makes relative color even more important.


 I’m working through the different fabrics, piecing the blocks as leaders and enders. 


Not enough contrast and you have a "muddy" block.  The block at right is after a couple of interruptions and the removal of a "muddy" section.  Take a look at my slides from Show and Tell to see the difference.


November 17, 2021 Show & Tell Slides


✔️ Making blocks from the house exercises from @cindygrisdela new book, Adventures in Improv Quilts and change up the color palette to neutrals,…..


Not exactly how Cindy Grisdela had imagined the exercises in her new book.  But, since when did I follow exercises as they were originally intended.


✔️ Adding a few techniques/blocks from other projects


I figure I need another 10 or more blocks, larger ones and then the puzzling begins.  


Every time I walk by my design wall I move a few blocks, take a picture and stare at it a bit more.  


From the wee hours last night, see the shadows in my photo.  I'm still making changes and taking even more pictures.


With any luck, I'll have something by the end of next week, just in time to go home.


Yes home, I'm working in our vacation home for yet another 2 weeks.  Whilst I have always quilted when I have come down to our vacation home, I haven't done as many technical projects.


Did I have a surprise!  I didn't have all my go to quilting supplies here.  I did bring my projects, some special rulers and my Acorn Products, I was still missing a few things.  I had a separate suitcase will all my projects and select notions but it still wasn't enough.  


Most notably I was missing, a design wall, a wool pressing mat, my small and large Karen Kay Buckley scissors, my Corner Pop tool.


Thankfully my son and daughter-in-law, thank you Alex, did bring a couple of items when they came down to visit.


So, as always, my missing items became my "Top 25 Notions" list.  Take a look at my list, is there some items that should be on your Christmas list?  Download a copy of my list below.  Sometimes, it is the simplest of things that can make our projects more successful.  


Next trip, I'm destined to have another full suitcase of my go to tools so I can play!  


My Top 25 Notions


Friday, 15 October 2021

Follow Up - Show and Tell October 6th, 2021 Moda Toweling Projects


I've received a couple of reach outs since October 6th, regarding my Moda Lakeside Toweling Projects.

My Simple Lined Placemats, were my original design and the downloadable pattern can be found on October 6, 2021 post.  Be sure to download a copy of my complementary pattern.

The Origami Market Bag Tutorial was a project from Lola Nova dating back to June 25, 2013.  I modified the original tutorial to sew the seams flat.  The details for this modification are in my Show and Tell slides.  Here are the links:

My slides:

October 6th, 2021 Show and Tell Slides

The link to the original tutorial for Lola Nova

Origami Market Bag Tutorial


If you are using Moda Toweling for your bag, consider my modification to use batting tape to hold the hemmed edges flat and together before zig zagging the seam.  

I also boxed the corners of my bag to get a rectangle shape for the bottom of the bag.

The simple bag without handles would be great for wrapping gifts, think Reusable Wrapping Paper.

As it gets cold outside, it's warm in our studios so Learn Something New, we have the time.


Wednesday, 6 October 2021

Simple Lined Toweling Placemats


The Holiday Season has arrived!  

Thanksgiving is around the corner, Halloween is just a couple of weeks and dare I say Christmas will be here in just 80 days!

Today, I have a simple project using Moda Lakeside Toweling that is perfect for gift giving.

If you are like me, you have grown children that have just started to set up their homes and these placemats are perfect for a modern or urban country home.

This 100% toweling comes in a variety of colors.  With its loose weave, I would suggest that you prewash the toweling before you start.  


To give the placemats some stability, I have lined them with quilting cotton.  You can leave them plain or add some big stitch quilting or raw edge appliqué for embellishment.

Consider making a matching bread cloth for the table as well.

Here is the link to the pattern for the placemats:

Simple Lined Toweling Placemats

Be sure you are ready for the Holiday Season with these simple placemats.


.


Wednesday, 8 September 2021

42 Plus 3 - My Gift to You


Thank You to our Quilting Community

The past 1 1/2 years has been challenging for all of us.  That said, I have been so grateful for technology that enabled me to continue to learn, teach and share with all of you. 

I'm pleased to share this quilt as my way of giving back to our amazing community!

Just in time for National Jelly Roll Day on September 15th, here is a Complementary Lap Quilt Pattern using the Studio 180 Corner Pop III Tool.


History of the Design

In 2016, I participated in an Improv Sunday workshop with Ray Steeves of 3 Dudes in Phoenix, AZ.  As part of the workshop we dove into a bucket of 2 1/2" strips to find 60 strips to start our project.  We were initially told to think sets of 6 strips.

Well, I like to be different - go figure!  The one who always has to modify a pattern to make it her own.  I came to the workshop with a 1/2 m of Kona Snow and 1/2 m of Essex linen.  I did raise Ray's eyebrows on this one.

With no pattern, no handouts and verbal instructions and a few bullets on a white board, we started to sew strip sets.  This is where my memory gets foggy.   


We cut squares from the strip sets.

We added  2 - 2 1/2" strips placed wonky on two sides of the stripped squares. 

Then the challenge began.  We were to cut consistently sized wonky squares from the blocks.  I say it was a challenge, as you know I'm kind of the precise cut and piecer (even back then). 

This one wasn't going to beat me!  

I did it!  My blocks were very different from the other class participants.  I made tonal blocks for my quilt.  I do love my quilt!


After the release of my Simply Modern Christmas pattern using the Corner Pop III,  I was drawn to revisit this quilt using this tool.

I modified the technique/design in several ways:

  • Reduced the strips in the strip sets to 5 - 2 1/2" strips in the smaller blocks, to better accommodate the use of a jelly roll plus a few strips
  • Simplified the construction, whilst managing the bias edges
  • Upsized the replacement triangles to coordinate with the strip sets
  • Consistently sized the unfinished Small Block to 9 1/2"

The Corner Pop III tool was the key to simplifying the construction of this quilt.


More about the Corner Pop III

The Corner Pop Tools differ as to the ratio of two sides on the replacement triangles.

Corner Pop - 1 to 1 ratio

Corner Pop II - 1 to 2 ratio

Corner Pop III - 1 to 3 ratio

The benefits of these tools include:

  • Increased consistency and accuracy of the replacement triangles
  • Fabric waste is minimized when compared to traditional techniques
Come join the journey for this quilt.  If you made my Simply Modern Christmas lap quilt, you already have the tool.  The complementary pattern will be released in steps every two weeks starting September 8th, 2021.  As always, the complementary pattern will be a PDF download from this blog.


The Details
  • Quilt top is 60" square
  • Fabric requirements:
    • 45 - 2 1/2"  WOF strips, a jelly roll plus 3
    • Fabric 1 - Contrasting Replacement Triangles, 0.6 m (3/4 yd)
    • Fabric 2 - Background, Replacement Triangles and border 1.2 m (1 1/4 yds)
    • Binding (suggest Fabric 2) - 0.6 m (3/4 yd)
For your Fabrics 1 & 2, select fabrics that contrast with your strips.


My selection for my next 42 Plus 3 lap quilt.

You don't need to have a jelly roll..., 

Consider stripping your stash? 

or 

What about all those leftover 2 1/2" binding strips?


There are 9 - Large Blocks in the quilt.  

There are 4 - Small blocks in each Large Block.

One strip set, comprised 5 WOF 2 1/2" strips will be the base for 4 - Small Blocks.

The quilt can be resized for a baby quilt using 4 Large Blocks, for a finished quilt that is 42" square.

I'm excited, are you?

Here is the link to Step 1 of the pattern:


Wednesday, 10 February 2021

Let's Tuckerize - A Valentine Mug Rug


I'm a devout "Tuckerizer"!  What is "Tuckerizing"?

Tuckerizing is a method of adjusting the cutting blocks slightly larger and using the Studio 180 Design Tools to trim the blocks to size.

The blocks are more accurate and despite cutting the blocks slightly larger, you end up saving fabric!  Did you know, only 10% of all quilters are accurate piecers.  With the Studio 180 Design Tools - you too can make more accurate blocks.  

Today, I'd like to share how to "Tuckerize" Cluck Cluck Sew's Heart blocks.  The link to Allison Harris' heart block tutorial can be found below:

Simple Heart Block

https://cluckclucksew.com/2015/01/making-heart-blocks-in-multiple-sizes.html

This tutorial provides instructions for making heart blocks in multiple sizes using a stitch and flip technique.  Allison has done the heavy lifting in the design and writing of the block.  The block sizes range from 4" through to 10" finished.

I must admit, my stitch and flip blocks have not been accurate.  However, by simply changing the technique to use the Corner Pop Tool, you will have accurate blocks that go together easily and with accuracy. 

With the size of the Corner Pop Tool, we can Tuckerize the 5" through 10" finished block sizes.  The size of the 4" finished block is just a bit small for this tool.  I have produced a chart which has the revised cutting for the 5" through 10" blocks. Here is the link to the PDF for the resized cutting instructions:

Let's Tuckerize Hearts

To make the Tuckerized Blocks simple, also take time to refresh you knowledge of how to use the Corner Pop Tool.  Letter sized instruction sheets can be downloaded for free from the Studio 180 Design website.  

Corner Pop Letter Size Instruction Sheet

I have printed the letter sized instructions for all my Studio 180 Design Tools and have them in sheet protectors in a reference binder.  It works well.

Let's start cutting the Valentine Rug Mug.  For the Rug Mug, we will be making a 5" finished size heart block.  Please refer to the chart in the resized cutting chart.  Of note, when you are cutting the background triangles, you first cut a square of the size noted and and then cut the square into two triangles by cutting along the diagonal of the square from one corner to the opposite diagonal corner.

Cut all the pieces for the 5" finished block using the resized cutting chart.

Select the 2 - 3" x 5 1/2" print rectangles and place them WRONG SIDES TOGETHER on your cutting mat.  Then using my Corner Pop tool and the 2 1/2" and 3/4" Cut Away Corner lines on my tool I cut the rectangles as noted in the photo below right.


The 2 1/2" Cut Away Corner line is used to cut the bottom right corner of both rectangles.

The 3/4" Cut Away Corner is used to cut the top right and left corners of both rectangles.

By placing the rectangles Wrong Sides Together, you will have a mirror cut on the bottom corners of the rectangles.  See the photo below.


Using the instructions from your Corner Pop tool, sew the replacement background triangles to the cut print rectangles.

Your seams will be more accurate if you have the print rectangle on the top when sewing on the rectangles.

Press to set your seams and on one rectangle, press all the seam allowances towards the print rectangle.

For the second print rectangle, press all the seam allowances towards the background replacement triangles.


Varying the pressing of the seam allowances will result in both intersecting seams along the center seam to "nest".  With the nesting of the intersecting seams, your heart block will be perfect!

Your heart block will measure 5 1/2" square.  Continue to construct your mug rug using the instructions on the Let's Tuckerize Hearts reference sheet.

For a little added interest, consider adding big stitch quilting on the "mock binding".

I hope your Valentine enjoy's their Valentine Mug Rug.

My go to Studio 180 Design Tools are part of my essential quilter's tool kit.  These tools are not a one project tool.