Saturday 30 July 2022

Revisit Scrap Basket 2 - a Wedding Gift

In preparation for a family wedding - my nephew, Matt and his wife to be, Candace, I gathered their input for a wedding quilt.  Let's be serious, I gathered Candace's input! 

My ask, which of my quilts designs would you like for a wedding quilt? 

Much to my surprise her choice:


My original Scrap Basket 2 quilt.  Yes, it is a scrap quilt.  Any of my quilting friends know I love neutral quilts and have amassed a large stash and scraps in this color palette. 

Working in a neutral palette can be a challenge.

With the assistance of our digital cameras/phones, you can master this challenge.

"Color gets all the credit, but Value does all the work!


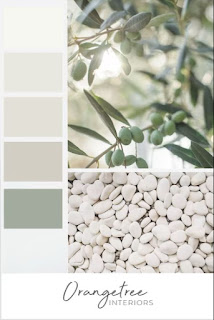
When I asked about a color palette for the wedding quilt here was her choice:

My first reaction, lovely how serene.

My second reaction, let's dive into my stash.

My last reaction,  I'm missing some greens!  Yes, I too had to go shopping for those sage greens and yes some darker greens.

Absent some variation in values, my design would become mud.  

Let's change up the palette to black and white to demonstrate the concept.


.Here is the same image in black and white. The color swatches at the left show little of the different values in the inspiration photo.

This was purposeful on the part of Orangetree, as it was a color palette for interior design purposes. Whilst this will work for interior design, it would pose a challenge in a quilt.

We need the range in values to define the design in a quilt.  

Absent the value range we have mud.  Whilst I understand this, I hope my niece will understand this as well as I add a range of values to their quilt.


Let me illustrate!

At left my image in black and white.


At right my image in color.


Do I have a range of values?


Perhaps yes!

Are you along to create your Scrap Basket 2 quilt?

Let's get started.

Consider using a monochromatic color palette in 2 - 3 colorways.  Try to include one Solid fabric per colorway.

The first step is to sort your scraps.  If your scraps are not sorted by color, the first step is to sort by color.  Then sort your scraps by value.

Color and value is relative.  Pick one fabric of the first colorway that "appears" to be a mid value, and start a new pile.  Then select another fabric and compare it to the original.

Is it darker or lighter?  I like to work left to right, lighter left and darker right, creating three piles for this colorway.  Essentially you will have created a light, medium and dark pile.  

Take a photo in black and white.  Look at the image, do you have some outliers?

If yes, adjust your piles and take another black and white photo.  Continue this process until all your fabrics are sorted.


Here are my fabrics sorted.


Join the Quilt Along and tame your scrap piles.

The quilt will finish at 60" x 72 and is constructed in 6 - 24 1/2" square blocks (there are blocks within these blocks) and 6 - 12 1/2" square blocks.

Download the instructions for Step 1 in the link below.

Scrap Basket 2 - Step 1

Feed your soul, take time to create.  It's not about keeping busy, it's about being at "piece"!


Monday 10 January 2022

42 Plus 3 - Steps 3 & 4

 It's a new year!  

Whilst it is a new year, some things have not changed.  

We are all spending more time at home and are looking to our creative outlets to pass the time and assist with our mental health.  I have often been told, you need to go down to your studio and play.  You may recognize the agitation or vibration that you can actually feel.  For me, when it really gets bad, the migraines also start.

After a few hours, my studio the agitation is gone and the migraine has started to subside.  

As we all retreat to our quilting spaces, it's time to continue progress on my complementary project, 42 Plus 3.  I recently finished steps 3 and 4 and my pattern testers have completed their edits.  

Today I'm sharing a couple of insights about how color can completely change a block.  Once you complete step 3 you may have noticed that you can assemble the large blocks one of two ways.  By simply changing up what side of the completed smaller blocks meet up in the center the design can entirely change.  Simply changing up the orientation of the Fabric 1 and 2 sides of the block the quilt will be very different.  This is best illustrated through photos.  

One of my pattern testers, Pat decided to only make 8 blocks and make 2 smaller table toppers as opposed to the larger quilt.  Her choice was influenced by her jelly roll only having 40 strips instead of 42 and some challenges in finding fabrics for the remaining 5 strips.  


Out of a challenge a new learning opportunity was born.  

Here is Pat's first layout of her large blocks.  This was Pat's initial thought was the layout with the black center star and partial stars on the perimeter of her table topper.

Pat will be adding a black border to this topper to finish it off.  


Now, switch it up!  No change in the blocks themselves, just a rotation of the blocks such that the center star and partial stars are now the pale pink fabric.  

What a difference!

For this topper, Pat will be adding a 3 1/2" cut pink border all around the blocks.  The stripped sections will then appear to float on the pink borders.

So, depending upon your available fabrics, you can always choose to change the color of your borders for a completely different look.  Pat's table toppers will finish at 42 1/2" square.

Here is the link for the pattern for steps 1 through 4: